Fusing A Cast Glass
Pendant
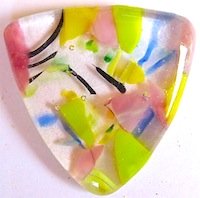
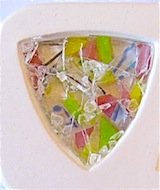
A cast glass pendant made from small opaque and transparent fusing glass pieces.
The item is kiln formed in a commercial glass fusing mold and produces a pendant 1.75 inches wide.
Small lengths of clear are used to line the bottom, patterned transparent and opaque glasses are laid over with small pieces of clear being used to cover the top
Gaps in the top layer are filled with pieces of medium frit.
This item is made from scrap lengths; always keep your scrap as you can use it in many different ways.
This project can be made from Bullseye or System 96.
There are a number of ways to make the small bits you will need.
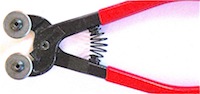
You can cut them with a cutter, break them off with grozing pliers or use wheeled mosaic nippers.
I find it is easier to use wheeled mosaic nippers as you can nip the pieces in half very quickly if you need to.
Cutting:
Safety glasses must be worn when cutting the scrap.
If you are using mosaic nippers cut along the edge so that you can control the size of the offcuts.
Try to hold your hand around the nipper so that the cut bits fall into your hand.
If you have a pair of safety gloves wear one on the hand catching the offcuts, many nipped offcuts will have needle sharp ends.
Use tweezers when placing the offcuts into the fusing mold.
On a general note wheeled mosaic nippers are a very handy tool to have in your tool kit, rods can be nipped to length, pieces easily cut from scrap, strips can be quickly cut into smaller lengths, these are just a few of the jobs these nippers will perform
Wash and dry the scrap before cutting, as it is very difficult to clean after cutting.
Try not to hold the scrap in the areas that you are cutting.
Material Required:
Wheeled mosaic nippers or grozing pliers.
Glass cutter.
Fusing mold.
Kiln Wash.
Fusing kiln.
Proceed as follows:
Step 1. Apply kiln wash to casting mold.
Step 2. Cut scrap to size.
Step 3. Place clear bits into bottom of dry mold.
Step 4. Put pieces of opaque and patterned glasses over bottom layer.
Step 5. Apply clear top layer, build up slightly towards the center to help counter shrinkage.
This happens because the material tends to compact downwards and may end up two thirds of its original thickness.
Generally the smaller the pieces the less they will compact.
Step 6. Place into kiln on small posts to ensure air circulation around the mold and fire as follows:
300 F (150C)/hour up to 1470 F (799 c).
Hold 20 minutes.
Check to ensure that item is fully fused.
If glass fusing is complete turn off kiln.
Allow to cool to room temperature and then remove.
This cast pendant can be further worked by adding clear dichroic to the bottom or top and kiln fuse again.
A mixed frit blend can be placed in bottom and the pendant kiln fired again.
This
type of mold is ideally suited for producing a large pendant as extra
layers will increase the size and weight of the finished art jewelry
piece.
Return From Cast Glass Pendant To Glass Jewelry Projects
