Fused Glass Aperture
Pour
A fused glass aperture pour produces a multi colored fusing glass slab which can be cut and used in jewelry and other art objects
Also known as a pot melt an aperture pour can produce a wide range of colors and shapes.
Pots And Molds
Scrap pieces are placed in a terra cotta, ceramic or stainless steel pot, which is then placed on kiln furniture in the glass fusing kiln, and melted, the glass flowing from the hole in the bottom of the pot.
Molds, terra cotta/ceramic saucers, stainless steelrings/squares, a kiln washed shelf or a pattern bar mold can be used to catch the glass.
A variation of this is a screen melt where the scrap is placed on top of a wire screen in the kiln and the melted scrap drops through the screen to create an original pattern.

Fusing glass aperture pour patterns (pot melts) can be varied by changing the hole shape in the pot or by having a number of holes in the bottom of the pot.
Extra holes can be drilled, or shapes altered with a drill, file or chisel.
Pots with small holes in the side are also suitable.
The height of the pot above the shelf or saucer will also influence the final aperture pour pattern.
Multi-hole commercial ceramic pots in varying sizes are available individually or in pot melt kits.
If using terracotta pots try to obtain good quality pots as inferior pots may crack during the melting process.
Glass
Only compatible glass should be used for an aperture pour, do not put different coe's in the same pot.
At the end of the aperture pour there will some fusing glass still in the pot, keep the pot for future use with the same colors as they will melt during the next firing.
For future reference, it is advisable to keep a note of the quantity and colors used for each melt.
When loading a pot dark colors should be kept to a minimum, they will overwhelm lighter colors unless used sparingly.
A mix of white and other opaque colors will result in a nicely balanced color scheme.
It is probably advisable to only use three colors as too many colors may result in a muddy finish.
In larger kilns, a number of pots can be set up without any problem.
When preparing the pot do not apply kiln wash, kiln wash needs to be heavily applied to the kiln shelf.
Preparation
Thin fire paper or fiber paper must not be used on the shelf as it may be picked up by the glass. Molds or saucers must be kiln washed.
If using stainless steel rings or squares sitting on a kiln shelf a strip of overlapping 1/8" fiber paper should be run around the inner rim.
Use a straight edge to cut the strip, as the bottom edge needs to be straight and even.
Pots are usually placed on ceramic strips, which are sitting on kiln posts or directly on top of a saucer or a ring.
When melting directly onto a kiln shelf ensure that the posts holding up the pot are well spaced to prevent them coming into contact with the glass.
Keep one shelf for use with melts as they can be very wearing on the shelf, whenever possible use some form of container to catch the melt.
A slab pendant mold from Creative Paradise is used for this project.
The mold will require five or six heavy coats of kiln wash.
The finished slab is 1/2 inch thick. Extra pieces were added to the pot during the pour to achieve this thickness.
Turn off the kiln and observe all safety precautions if adding glass during the process.
Pouring Instructions
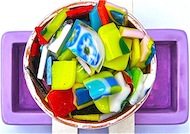
Step 1. Place scrap pieces in selected pot.
Step 2. Using either prepared kiln shelf or container place in kiln and build framework to hold pot.
Step 3. Center pot on framework over mold, check to ensure that posts will not come into contact with pour.
Step 4. There are many firing schedules for pours or melts, the following schedule can be used for a four inch pot.
During the pot melt you may need to adjust this schedule as pot size, glass weight and color as well as type of kiln may result in the need for an alteration to temperatures and firing times.
300 (150C) dph to 1000F (538C) hold 15 minutes
300 (150C) dph to 1100F (593C) hold 15 minutes
500 (260C) dph to 1650F (900C) hold 90 minutes
Drop AFAP to 1500F (815C) hold 45 minutes
9999 (as fast as kiln will go) to 950F (510C) hold 60 minutes(1 hour per 1/4” thickness)
100 (212C) to 850F (454C) hold 1 hour
100 (212C) to 650F (343C) hold 15 minutes then switch off.
Do not open until cooled to room temperature.
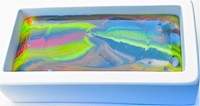
The finished melt may have a small section of stringer in the middle, this can be ground away if needed.
If the stringer is too thick then the melt may need to be fired again and the stringer melted into the slab.
The photo at the top of the page shows a melt that has been re-fired to fuse the stringer into the block.
Kiln wash may stick to the melt due to the high temperatures involved. Wet diamond hand pads are very good for removing any remaining kiln wash.
For stubborn kiln wash removal please visit our kiln wash removal page.
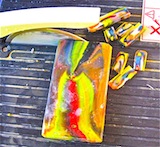
The
glass melt can be cut on a tile saw to make jewelry,pendants, earrings
or may be further worked to use as inserts for other glass fusing
projects.
If it has been melted into a ring it can be turned into a lovely piece of art by cold working and fusing onto a base plate.
The plate can then be capped with clear disc to make a stand alone ornament that can be mounted in a metal frame.
Round melts can also be enclosed with a contrasting color circular rim to produce an original piece of fused art.
Return From Glass Aperture Pour To Glass Fusing Projects
Return To Home Page


