Copper Clay Pendant With
Tree Of Life Feature
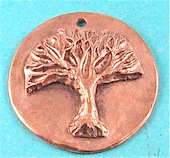
Tree Of Life Pendant
A copper clay pendant made from Copprclay 100 Gm, combining a copper backing plate and a molded copper clay centerpiece.
Using basic metal clay tools this copper clay pendant is very easy to make and can be changed to suit the large variety of molds and cutters available.
Materials
• One packet of COPPRclay™
• Coconut shell activated carbon
Tools
• Small rolling pin
• Rolling slats or playing cards
• Work surface
• Cool Slip or olive oil
• Flexible silicone mold
• Circular cutter
• Sanding pads or wet and dry sandpaper
• Stainless steel brush
• Firing container
• Programmable kiln
Step 1. Lightly spray your hands with either cool slip or rub a few drops of oil on your hands then rub over your rolling mat and on your roller.
A plastic report cover makes a very good work surface as the insides can be oiled and the clay placed in between the covers and then rolled. Make sure the top sheet is not too thin as it may crinkle during the rolling process.
The rolling pin does not need to be oiled if a report cover is used.
Roll a piece of clay into a ball with your hands then place on chosen work surface between two playing cards or slats and roll flat with roller.
Step 2. Rub some oil on the edge and inside of the circular cutter then place on top of the metal clay and press down. This is the backing piece for the molded centerpiece.
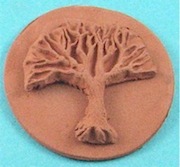
Step 3. Roll clay into a ball and place in the centre of the mold. Press firmly spreading the clay into mold making sure that the clay completely fills the mold right to the edges.
Gently run your roller over the back of the clay making it as level as possible. This last step is important as it will cut down the sanding required when the piece is dry.
Wait for the clay to settle in the mold (approximately 15 to 20 minutes depending on the temperature) then gently remove the clay from the mold.
Remove any excess clay around the edges of the tree using a craft knife, place the piece on a piece of plastic on a flat surface and dry according to the manufacturers directions.
You can tell when your clay piece is fully dry by placing it on a mirror for five seconds. If there is condensation on the mirror when you remove the piece, then the piece is not yet dry.
Step 4. Once the pieces are completely dry use either a medium grit sanding pad or wet and dry sandpaper to ensure that the disc is flat and even, finishing off with fine grit. Use a circular motion so that you get an even edge.
Clean up molding as required.
Apply distilled water with a paint brush to the rear of the molded tree and press onto backing disc, leave to dry.
Drill a small hole for the jump ring. Be careful not to drill the hole too close to the edge as the clay shrinks during the firing process.
Step 5. Unlike precious metal clay, copper clay must be embedded in a container of coconut shell based activated carbon to prevent oxidization of the copper.
The container may be stainless steel or ceramic.
Pieces of stainless steel may flake off from outside the container during firing and leave a black residue in the kiln.
Always follow the clay manufacturers instructions when kiln firing metal clay.
When the pieces are cooled brush them with a stainless steel brush to smooth the surface and give a nice copper appearance.
The piece may also be polished in a tumbler with stainless steel shot.
Clean tumbling container and shot thoroughly after polishing copper.
The copper clay pendant can be rubbed with carnauba car wax to protect the finish and to prevent tarnishing.
Return From Bronze Clay Pendant To Metal And Bronze Clay
Return To Home Page


