Fusing Glass Fridge
Magnets With Decals
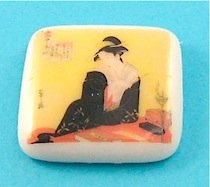
Fused glass fridge magnets can be easily made from a few pieces of stacked fusing glass, a decal and fiber paper.
The methods used for this piece can be applied to a wide variety of art glass fridge magnets.
A wide range of decals can be found for this projects.
The image used here can be found in many polymer clay supply stores.
Low fire or hi fire decals may be used in place of resin coated decals.
Magnets available in different sizes and shapes can be purchased from craft shops or from online suppliers.
There is no set size for the glass used as it can be varied to suit the size of the magnet.
Oversize glass, due to its weight, may not be suitable for small magnets as the magnet will have difficulty in gripping a metal surface strongly.
Spectrum 96 glass has been used for this example. It can also be made from Bullseye glass.
Fusing Supplies:
A piece of white fusing glass.
Decal.
Magnet, a 5/8 inch diameter by 1/8 inch thick has been used for this tutorial.
Fiber paper 1/8 inch thick.
Scissors.
Glass cutter.
White glue.
Two-part epoxy.
Prepared kiln shelf.
Glass fusing kiln.
Mod Podge or similar sealant.
ICE Resin or an epoxy coating resin.
Resin safety equipment.
To make the fridge magnet proceed as follows:
Step 1. Cut two x one inch squares of white fusing glass.
Step 2. Place magnet on fiber paper and draw around magnet with marking pen.
Step 3. Cut around shape with a pair of scissors.
Step 4. Put a drop of white glue in center of glass and place fiber circle on glue.
Step 5. Place glass with fiber circle down on prepared kiln shelf. Stack white glass on top of base glass.
Step 6. Put kiln shelf in glass fusing kiln. Bring temperature up to around 1000°F (538° C), if using thinfire paper keep glass kiln vented until binders have burnt away.
Step 7. Bring temperature up to about 1500°F (816° C). Hold for ten minutes. Check shape, if fully fused switch fusing kiln off and allow to cool to room temperature.
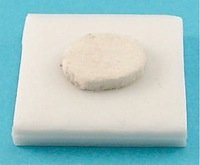
Step 8. The fiber circle should have carved a recess in the fused glass to hold the magnet. Use some sand paper to roughen up inside the recess.
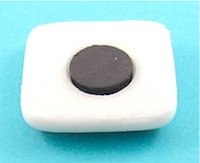
Step 9. Mix a small amount of two-part epoxy and apply to the glass, place magnet in recess and allow to dry.
Step 10. Cut decal from sheet and apply to glass as per decal instructions.
Step 11. Apply Mod Podge or similar sealant to decal, make sure the image is completely covered, especially the edges, otherwise the resin may seep under the decal.
Step 12. After sealant has dried mix resin, don't forget to wear the proper safety equipment.
Place pendant on a couple of layers of grease proof paper and apply resin with a wooden craft stick or other disposable item.
Make sure your work area is fully protected.
If a pouring resin is used it is preferable to apply it with a craft stick to prevent uneven coverage.
Check pendant to ensure it is entirely covered. The resin will sometimes run and leave some gaps on curved surfaces.
Any gaps should be carefully filled in.
Try not to let a large lip develop around the bottom of the glass as it will be difficult to remove.
If any bubbles appear blow gently across the pendant to remove them.
Return From Glass Fridge Magnets To Glass Fusing Projects
Return To Home Page


