Fusing Glass Pendant
And Decal
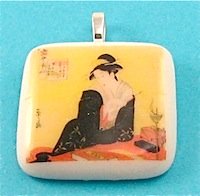
Making a fusing glass pendant decorated with a clear epoxy coated decal. This item has two pieces of fusing glass, a decal designed for polymer clay and clear resin.
It is fused using contour fusing temperatures so as to produce an item with softly rounded edges to which the transfer is applied.
Due to the transparency of the decal it must be applied to a light colored base such as white. You can experiment with this as some colors may enhance the transfer colors.
A dark colored base is generally not suitable as all the transfer details will be lost in the dark color. As a contrast you can fuse a dark color to a light color layer and apply the transfer to the light colored surface.
Two white layers have been used in this item.
For decoration a polymer clay water slide design has been used, unlike glass fusing decals these cannot be fired in a kiln. There are a large variety of sheets available. For this project a Lisa Pavelka Signature Series decals was used.
The pendant is finally coated with clear epoxy coating for protection and to give it a high gloss finish
Material Required:
- 2 pieces of white glass, about 1"x 11/4".
- Thin fire paper or kiln washed shelf.
- Cutter.
- Kiln.
- Mod Podge or similar sealant.
- Polymer clay transfers.
- ICE Resin or an epoxy coating.
- Resin safety equipment.
Fusing Instructions:
1. Select decal and measure, do not cut from sheet.
2. Transfer measurement to the glass and cut two pieces slightly smaller.
3. Wash and dry layers thoroughly.
4. Using prepared shelf or thin fire paper stack the white base on top of the black on the shelf. Put shelf into fusing kiln.
5. Bring temperature up gradually to about 1400 F (760 C). If using thin fire paper keep kiln vented until the binders burn off and then close vent.
Hold at around 1400 F temperature and watch for edges to soften and become rounded. You may need to adjust the temperature to achieve the desired outcome.
Do not over heat.
6. Switch off, vent kiln and allow temperature to drop to about 1000 F (540 C). Close kiln and cool to room temperature.
7. When cool remove item from kiln.
Applying Decal & Resin:
Measure pendant again, it may have spread slightly. Cut decal from sheet and trim to size.
Follow instructions and apply to item surface.
When decal has dried apply Mod Podge or similar sealant to
design,making sure that the image is completely covered, especially the edges, this is very important to prevent resin seeping under the edges.
- After sealant has dried mix resin, don't forget to wear the proper safety equipment. Place pendant on a couple of layers of grease proof paper and apply mixture with a wooden craft stick or other disposable item.
- Make sure your work area is fully protected.
- If a pouring epoxy is used it is preferable to apply it with a craft stick to prevent uneven coverage,check surface to ensure it is entirely covered.The coating will sometimes run and leave some gaps on curved surfaces, any gaps should be carefully filled in.
- Try not to let a large lip develop around the bottom of the object as it will be difficult to remove.
- If any bubbles appear blow gently across the surface to remove them.
- After twenty four hours check the coating. If it is not soft to the touch you can begin to remove it from the paper.
- You will probably need to gently trim the edge with a craft knife. Do not let resin cure until it is very hard or you will have difficulty removing theitem from the paper.
- Sand the back of the piece and apply a bail with two-part epoxy.
Return From Fusing Glass Pendant To Handmade Glass Jewelry
Return To Home Page


