Open Weave Fused
Glass Plate
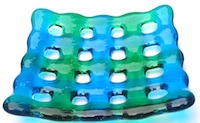
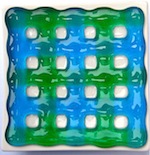
Transparent fused glass plate in an open weave style laid on a clear base and then fused and slumped in a glass fusing kiln.
This plate is made from a number of colored transparent strips and clear glass.
Either COE 90 or COE 96 can be used to make this plate.
Size, colors and number of strips can can be altered to suit design choices and slumping mold size.
Project Supplies
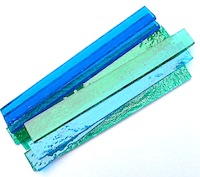
Ten x 4 3/4" x 1/2"wide transparent fusing glass strips, five of each color.
One clear base 4 5/8" square.
Cutter.
Fusing kiln.
Kiln washed shelf or thin fire paper.
Slumping mold.
Fusing Instructions
Step 1. Cut strips and glass base to size.
Step 2. Place clear glass base on prepared kiln shelf.
Step 3. Place a vertical layer of strips, spaced evenly, on clear base in the following order: blue, green, blue, green, blue.
Next place strips horizontally: green, blue, green, blue, green, strips will be slightly longer than the clear base.
Step 4. Place shelf in fusing kiln.
Step 5.You can use your own firing schedule or use this one as a guide:
| RATE | TEMP(F) | HOLD(mins) |
| 300 |
500 |
15 |
| 300 |
1000 |
15 |
| 450 |
1450 |
20 |
| 9999 |
900-950 |
60 |
| 200 |
200 |
OFF |
Check item at 1450 F to ensure that it has fully fused.
Step 6. Remove fused plate from kiln when cool.
Step 7. Place plate in slumping mold and load into kiln.
Step 8. Use above schedule but replace 1450 F with 1320 to 1350 F for the slumping process.
Monitor slumping to ensure that the item slumps correctly.
Step 9. Remove fused glass weave plate from kiln.
The plate should be nicely slumped with smooth sczlloped edges.
Return From Fused Glass Plate To Glass fusing Projects
Return To Home Page


