Fused Glass Bubbles
Coaster
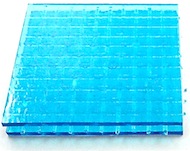
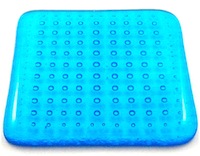
Make a glass bubbles coaster from transparent fusing glass and trapped air bubbles within a glass stringer grid.
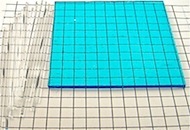
The glass and stringers are placed over a grid template and then glued in place.
When fused, the glass bubbles coaster has rows of evenly spaced rows of air bubbles trapped between the stringer grid.
The coaster is made from Bullseye three and a half inch square transparent colored fusing glass and stringers.
System 96 may be used in place of Bullseye.
The coaster size and transparent colors can be varied.

Fusing Supplies:
Colored transparent fusing glass.
Clear glass stringers.
Glass cutter.
Shelf primer or thinfire paper.
Fusing glue.
Glass fusing kiln.
Sheet of white paper.
12 inch ruler.
Fine point pen.
Proceed as follows:
Step 1. Cut two squares of transparent colored glass about three and a half inches square.
Step 2.Place one square on a sheet of white paper and draw outline of square.
With a ruler mark off quarter inch spaced lines horizontally and vertically. Draw lines to make up grid as per photo.
Step 3.Cut stringers to fit on grid. Stringers should be from edge to edge.
Step 4.
Place glass square back on grid, line one layer of stringers up with
grid lines and glue to glass.
Once stringers are dry, glue next layer over the top to form the grid.
Wait for glue to dry then place other square on top of grid.
Step 5. Use either the following firing schedule or your own:
1. 300°F (148°C) up to 1150°F (624°C) hold 40 minutes
2. 300°F (148°C) up to 1370°F (743°C) hold 30 minutes
3. 500°F (260°C) up to 1460°-1480°F (793°-804°C) hold 50 minutes.
(Check progress at this segment to determine if holding time should be increased or decreased, subject to bubble formation.)
4. AFAP* down to 950°F (510°C) hold 60 minutes
5. 100°F (56°) down to 700°F (371°C)
6. AFAP down to 70°F (21°)
(AFAP* as fast as possible.)
Once glass kiln has cooled to room temperature remove fused art glass coaster from kiln.
Inspect coaster to see if it needs any cold working.
Due to the overall
thickness of the piece, any cold working should be minimal.
The grid technique used for the coaster can be used to make inserts for plates, wall lamps or other fused glass art ornaments.
Simply enlarge
or reduce grid size to fit project size.
Return From Glass Fused Coaster To Glass Fusing Projects
Return To Home Page


